I've written some posts in the past about secure web browsing and I'd like to post this as a new update. You can read one of the original posts from this link .
[ http://phreshnewmedia.blogspot.com/2015/08/secure-your-internet-browsing-using_24.html ]
It is very similar to what I'm posting below but I've now added a couple more things.
First off, I recommend to use only Mozilla Firefox as it has been the most reliable browser for me this year. I used to have Google Chrome as my default browser but it let me down more than once on occasion. I've made Mozilla Firefox my default browser and not Microsoft Edge, or Google Chrome. While both Chrome and Edge are very speedy browsers, I've found that Edge was too intrusive with my personal info, sending tracking data and other pieces of info to Microsoft, and I also found Chrome to be a little too volatile, with freezing, crashing, and having some add-ons and plugins fail. While both of those browsers work fine for some people, I just prefer having a better open-sourced program in Firefox because it works extremely well and isn't from a huge corporation. [ www.getfirefox.com ]
Here's how to optimize Firefox for a secure web browsing experience.
Open Firefox --> click on the three horizontal lines in the top right corner to open the settings menu.
--> click on "Options" --> click on the "Privacy" tab
--> under Tracking select the first option 'Use Tracking Protection in Private Windows'
--> just underneath that also click on 'manage your Do Not Track settings' and put a check in the box.
--> under History select "Never remember history"
--> click "OK" button
The
next part involves installing third party extensions to further protect
your browser. These features aren't automatically built in so we have
to add them in.
-->
when using Firefox, you can just click the links below to
instantly be taken to the page where you can choose to install them in
Firefox. Simply click the "+ Add to Firefox" button.
The two extensions I recommend are these:
1.) AdBlock Plus - helps by blocking intrusive advertisments and annoying pop-ups.
2.) AdBlock for Youtube - same as above but specifically for the Youtube video website.
3.) Adblocker for Facebook - blocks ads and pop-ups while using Facebook.
4.) Strict Pop-up Blocker - much more effective than the built-in pop-up blocker. Once installed it will show a small page icon to the left of the settings menu (three horizontal lines) on the top-right. Click on the small page icon once to toggle the
red circle with a slash through it to begin blocking pop-ups. Toggle it
off when needed.
Please also note that some sites, do require you to allow pop-ups once in a while. Some Webmail and collaborative sites like Office 365, and some organization learning websites are designed to use pop-ups.
Tuesday, November 15, 2016

Wednesday, October 19, 2016
Walt Jimenez - The Wi-Fi Surveyor


Wi-Fi Generation Standards:
1.) "B" 802.11b - released 1999 with transfer speeds up to 11 MB/s
2.) "A" 802.11a - released 1999 with transfer speeds up to 54 MB/s
3.) "G" 802.11g - released 2003 with transfer speeds up to 54 MB/s
4.) "AH" 802.11ah - released 2007/2016 with transfer speeds up to 350 MB/s
5.) "N" 802.11n - released 2009 with transfer speeds up to 600 MB/s
6.) "AC" 802.11ac - released 2014 with transfer speeds up to 1000 MB/s
7.) "AF" 802.11af - released 2014 with transfer speeds up to 600 MB/s
8.) "AC" 802.11ac Wave 2 MUMIMO - released 2016 with transfer speeds up to 6000 MB/s
9.) "AD" 802.11ad - released 2016 with transfer speeds up to 7000 MB/s
I am probably the most experienced solo Wi-Fi site surveyor in all of British Columbia and Western Canada. Over the past 12 years since 2005, I have performed hundreds of Professional Wireless Site Surveys and completed Wi-Fi Assessment reports for individuals, and small to medium sized businesses, and large organizations.
I have successfully designed over 2000 Wi-Fi hotspot location deployments as far as Yukon Territories and Alberta and Saskatchewan. I have revamped problematic Wi-Fi deployments with necessary hardware upgrades and relocations. I have designed topographical maps for Wireless Access Point network installation locations.
Most of this info can be found inside my professional resume and LinkedIn career profile here
[ https://ca.linkedin.com/in/walt-jimenez-612b372 ]. I have a passion for Wi-Fi and it is a technology that keeps growing and getting better as time goes on. Think of a moment when you wished you had Wi-Fi. It's a luxury we never had in the past, and now it's so common we sometimes forget how important it can be.
Here's a few more interesting Wi-Fi links you should check out:
http://phreshnewmedia.blogspot.ca/2015/11/extending-wi-fi-home-part1.html
http://phreshnewmedia.blogspot.ca/2015/12/extending-wi-fi-home-part-2.html
http://www.sciencealert.com/this-new-transmitter-could-make-your-wi-fi-connection-10-times-faster?perpetual=yes&limitstart=1
https://www.youtube.com/watch?v=JhAuROEEZD4
Thursday, September 29, 2016
Kodi Setup Guide Step-By-Step

Kodi Setup Guide Step-By-Step:
1. Download Kodi (XBMC)
Go to http://kodi.tv/download/ and select the right operating system for your device or pc. You can also download it on Play Store for Android.
2. Add Fusion repository
Go to System--> File Manager --> Add source and in the box where it says <None> type http://fusion.tvaddons.ag
Then enter 'Fusion' or any preferred name in the bottom box. I use -- FUSION -- [[this will put it on the top of the list]]
3. Install Fusion
Go to System--> Settings--> Add-ons--> [[may need to go back 2 directories so click ... until you see the option to install from zip file]] --> install from zip file--> Fusion--> start-here--> plugin.video.hubwizard-1.2.0.zip
- wait a minute or a few depending on the processor speed of your device. On the bottom-right of the screen you will see a pop-up message stating "Config Wizard Add-on enabled"
4. Install Config Wizard
Go to Programs--> Config Wizard--> click and choose the device you are installing on. A pop-up will ask "Would you like TVADDONS.AG to customize your add-on selection?" Choose "Yes".
It will begin downloading extra data and add-ons and will show a status bar. Once the Config Wizard says 100% complete, it may exit to the menu by itself, but depending on the device, it may get stuck. If it gets stuck, reboot your device.
Monday, August 15, 2016
My Hard Earned Custom Ride
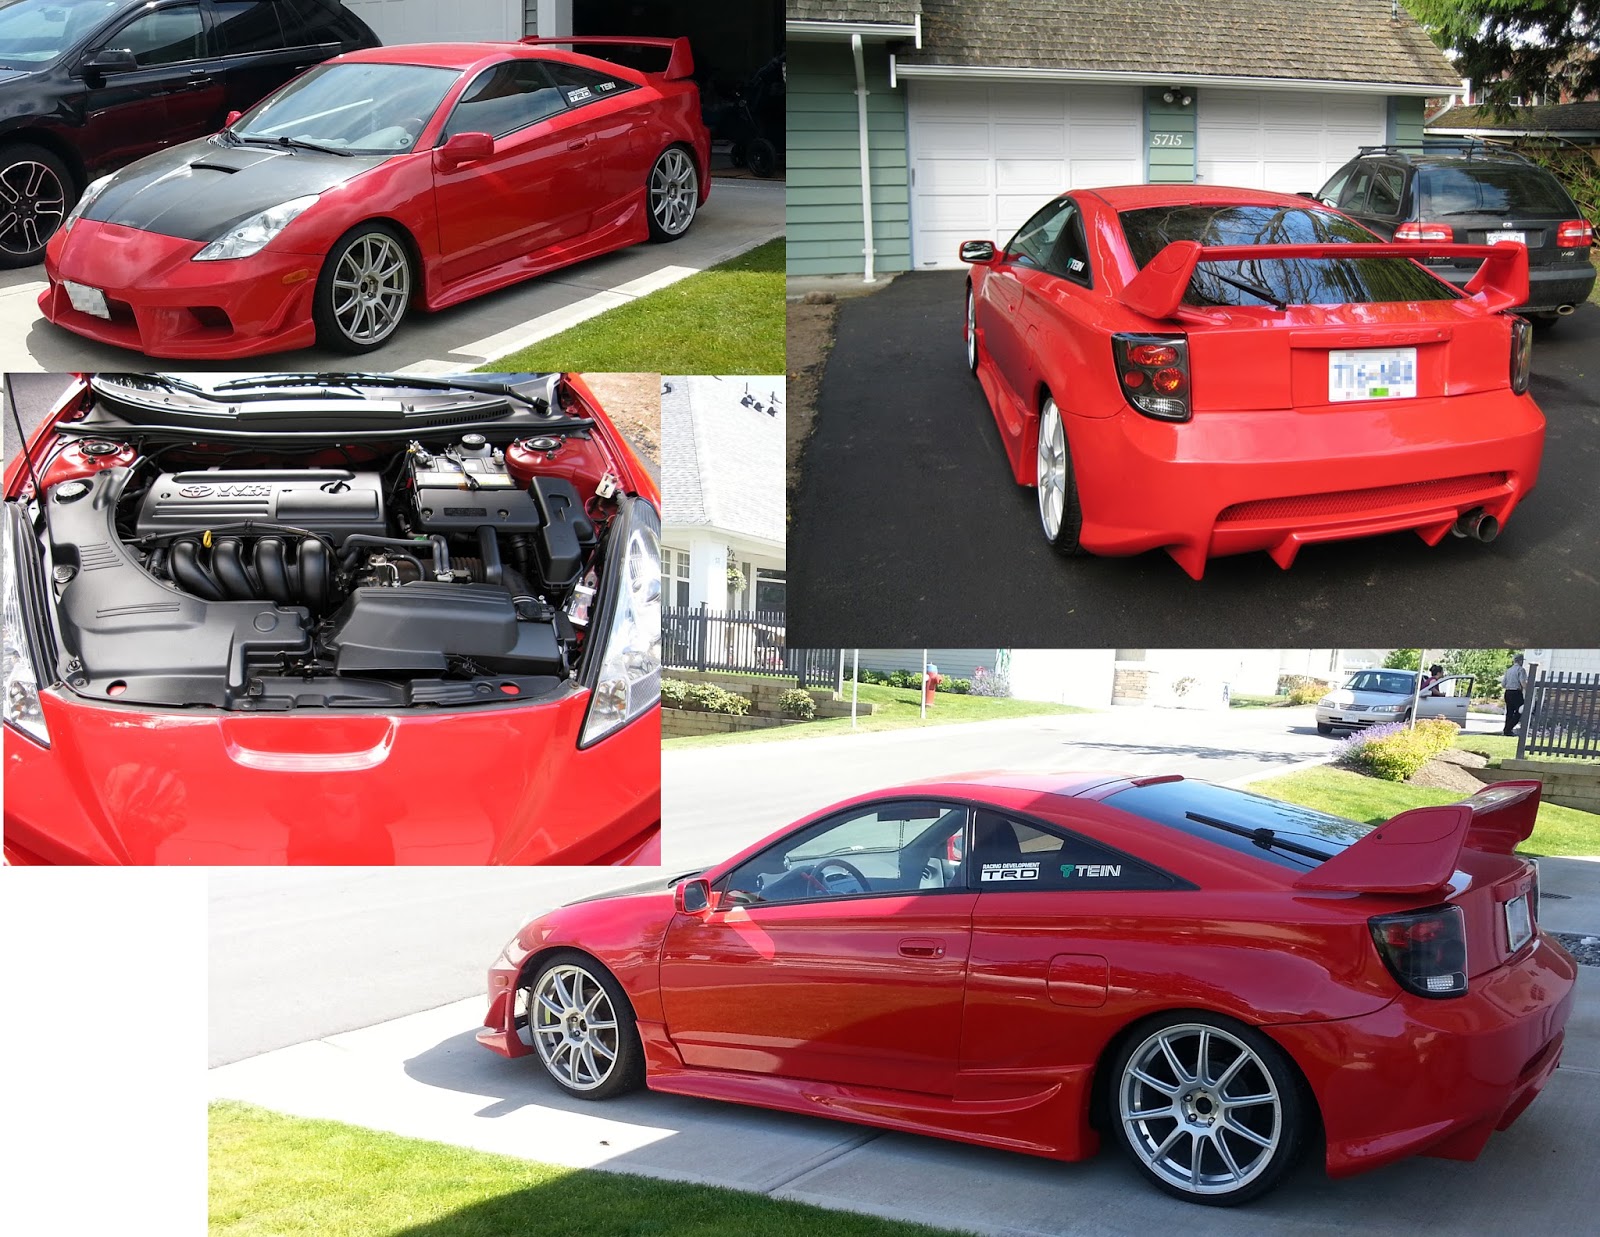
I earned this car with my own money. I didn't get any financial help from any parents or relatives and did it solo. It required alot of savings and effort from 9 years of hard work in I.T. and the computing field and living in an incredibly expensive city of Vancouver. If anyone thinks I came upon this car with any kind of ease then they need to be kicked in the face and told the truth. My car is a symbol of how hard I work and how far I've come. When I moved to Vancouver in the year 2000 after graduating college I had only $450 dollars in my pocket, a duffle bag of clothes and my home computer to start with. My vehicle is a very rare and ultra customized 2002 Toyota Celica GT/TRD (Gran Turismo Toyota Racing Development). I bought my car in April 2009 second hand and in great shape. I only added a few of my own touches to make it the piece of art that it is today. I bought it for roughly only $16,000 dollars and it was a really great deal. The car with the amount of aftermarket modifications could easily be worth $40,000 dollars.
I take my driving very seriously. I was taught to drive by my eldest brother Conrad before I was 12 years old in 1992. He took it upon himself and taught me to drive since our father passed away and lost his battle to cancer the year earlier when I was nearly 11 years old. I remember that my brother tricked me into driving when I really didn't want to. He said "let's go to the video store and rent a Nintendo game". We went to the video store and I got the game I wanted, and then we took a drive out to the highway headed to the United States border. We reached a quiet straight stretch of highway and he pulled the car over to the side and tells me to get behind the wheel or we're not leaving. That was the beginning of many lessons that would turn me into the smart driver that I am today. In retrospect, it may have been illegal to do that since I was not the driving age of 16 yet, but the back roads he taught me on were pretty much desolate and empty so there was no real danger for me or any other drivers.
Today I still obey traffic laws and I don't speed recklessly. I do respect other drivers and I refuse to drive like an idiot even when other drivers piss me off. I could outdrive many people if I needed to. I had three older brothers that enjoyed driving and I inherited a part of their leadfoot mind state. Instead of wreaking havok on the real road I actually enjoy taking out alot of frustration by playing alot of racing simulator games and even have the racing steering wheel and foot pedals for my XBOX 360.
Vehicle Specifications for my 2002 Toyota Celica GT/TRD:
Color: Glossy Candy Coat Red
Engine: 1.8L Variable Valve Timing (VVT-i) 16 valve 140 horse power
Transmission: 5-speed manual
(* indicates aftermarket add-on)
Interior:
- power locks + windows
- Air Conditioning
- red & black Suede leather seats,
- red & black leather wrapped steering wheel
- red & aluminum sport pedals
- red & black leather wrapped gear shift knob
- Broadway oversized rear view mirror *
- Audio Deck: Eclipse 7-inch touch screen DVD + MP3 with GPS Navigation *
- Audio enhanced JBL 10-inch subwoofer + felt bassbox *
- Alpine 3541 Audio Amplifier 140W *
Exterior:
Suspension: Tein lowering springs with 4-inch ground clearance *
Body Style: Celica 7th Generation TRD SSII fully loaded
Body Kit: BoMex Aero complete set front bumper, rear bumper + air diffusers, left and right sideskirts ****
Hood: Tanabe Carbon Fibre *
Headlights: Xenon HID *
Wheels: Falken Ziex 512 high-performance tires ****
Rims: Racing Heart Evolution 18-inch chrome x 4 ****
Exhaust: APEXi N1 chrome catback exhaust with silencer *
Additional Accessories:
- StreetGlow Red LED lights for tire valve caps
- red & black Toyota carry pouch
- USB plug adapter for cigarette lighter
- white title vinyl decals for aftermarket brands "BoMex" and "APEXi"
- grey car cover exterior protector
- Noco G3500 car battery tender and charger
Tuesday, August 2, 2016
Ultimate PC Configuration - Summer 2016
Here's an expert enthusiast hardware configuration for an Extreme Performance Gaming PC with some of the most current and best rated hardware components:

Computer case:
In Win 805 Infinity
= $ 250.00
Power supply:
Corsair HXi Series 750W High-Performance ATX Power Supply
= $ 230.00
Motherboard:
MSI Z170A Gaming M7 Motherboard
= $ 330.00
Processor:
Intel Core i7-6700K 4.2GHz Quad-Core Skylake Processor
= $ 460.00
Memory:
Corsair Vengeance LPX 32Gb DDR4 3600 MHz
= $ 320.00
Video card:
Gigabyte GeForce GTX 1080 Extreme Gaming 1936 MHz superclocked
= $ 960.00
Storage:
SanDisk X400 1TB M.2 Solid State Drive
= $ 400.00
Monitor:
Acer Predator Z35 Curved IPS 200Hz Monitor
= $ 1450.00
Ready for a throwback? Check out my very first blog article on Ultimate PC Configurations.

Computer case:
In Win 805 Infinity
= $ 250.00
Power supply:
Corsair HXi Series 750W High-Performance ATX Power Supply
= $ 230.00
Motherboard:
MSI Z170A Gaming M7 Motherboard
= $ 330.00
Processor:
Intel Core i7-6700K 4.2GHz Quad-Core Skylake Processor
= $ 460.00
Memory:
Corsair Vengeance LPX 32Gb DDR4 3600 MHz
= $ 320.00
Video card:
Gigabyte GeForce GTX 1080 Extreme Gaming 1936 MHz superclocked
= $ 960.00
Storage:
SanDisk X400 1TB M.2 Solid State Drive
= $ 400.00
Monitor:
Acer Predator Z35 Curved IPS 200Hz Monitor
= $ 1450.00
Ready for a throwback? Check out my very first blog article on Ultimate PC Configurations.
Sunday, July 10, 2016
Get Faster, Smoother Videos on YouTube and Twitch


Net range 173.194.0.0 - 173.194.255.255 is owned by Google (YouTube)
Net range 206.111.0.0 - 206.111.255.255 is owned by Amazon/XO Communications (Twitch)
These IP addresses are caching servers used for video streaming sites. They are congested and sometimes bandwidth is throttled on them to allow for more connections. Blocking these IP address ranges forces YouTube or Twitch to use a different caching servers that will deliver faster, and smoother video playback.
=================================================
Start -> Control Panel--> System and Security --> Administrative Tools > Windows Firewall With Advanced security.
- On the left side of the firewall window click on the "Inbound Rules" option.
- On the right side of the screen click on "New Rule..."
- Click on the "Custom" radio button and then click "Next>".
- Make sure the "All programs" radio is selected then click "Next>".
- On the protocol and ports options leave everything at its defaults and click "Next>".
- On the scope screen you will see two boxes the top one is for local IP addresses and the bottom is for remote IP addresses. In this scenario we are trying to block an outside (remote) IP from accessing anything on the server so we will need to add the IP address to this section only as it will not be a local IP address.
- On the bottom selection "Which remote IP addresses does the rule apply to?" Click on the radio button that says “These IP addresses”
- Click on the "Add..." button.
- Click on the second radio button "This IP address range". Enter either of these ranges.
For Twitch:
From 206.111.0.0
206.111.255.255
For YouTube:
From 173.194.0.0
To 173.194.255.255
- NOTE** You can only do one rule at a time. For me I only picked the Twitch IP range.
- Click "OK", click "Next>".
- Make sure you select the "Block the connection" radio button on the next screen and then click "Next>".
- Leave all of the options on the next screen checked. This will be sure to block the IP no matter the connection they are trying to use. Click "Next>".
- Name the rule on the next screen something you can remember in case you wish to remove or edit it in the future. Click "Finish" and thats it.
- Repeat the steps if you want to make a rule for YouTube. I found that my YouTube videos play smooth without any changes. If you do want to apply the rule for YouTube, You'll need to go through the steps for a new rule separately.
Tuesday, June 14, 2016
Video Game Streaming - Follow Me as "Phresh_Ninja79"


I'm venturing into unknown territory and will be trying my hand at Video Game Streaming. If you don't know what that is, it is when someone like me broadcasts their gameplay on the internet for others to view and and enjoy. Viewers can follow, or subscribe to the streamer to help them become more well known.
Help me out on my new journey and check out the links and hit the follow or subscribe buttons.
I'll be broadcasting on two main places:
1.) Twitch - https://www.twitch.tv/phresh_ninja79
2.) YouTube - https://www.youtube.com/user/phreshninja
I've been an avid fan of Video Games my entire lifetime. Video Games are my true passion and have been my long time hobby on the side. I am a Gamer 4 Life.
Whether or not I'm successful at Video Game Streaming, I'll continue to do it to gain more fans and more loyalty and recognition during the long run. If it pans out and continues to be successful and generates some funding, I will add more interactive features later on like "Prize Raffles" and "Give-aways" etc.
Hope to see you all online, and don't forget, you can also follow me on other Social Media, such as:
Twitter [ @phresh_ninja 79 https://twitter.com/phresh_ninja79 ]
Facebook [ https://www.facebook.com/PhreshNewMedia ]
Instagram [ #phresh_ninja ]
Peace!
Walt Jimenez (a.k.a. Phresh_Ninja79)
Subscribe to:
Posts (Atom)